

Read this first
Replicator is an outstanding feature in Modo. It allows us to replicate one object thousand of times using a fractions of our computer resources.
Modo offers many tools to replicate our meshes at will, but sometimes we need to use a small trick to avoid mistakes like interpenetration with other objects [I agree: the word "interpenetration" is a little intimidating].
This is one of the most cases: grass that grows around objects like stones, trees, tiles, scarecrows, mole holes, garden gnomes and so on.

Someone prefer to delete the mesh under the objects, but I don't really like this method because we may need to rearrange the scene and we can't waste our time to rebuild the ground.
This tutorial is a result of a good discussion in Luxology forum: Link
Ok gardeners, create the scene and place the camera.

Place in the scene some separated blades of grass [or small groups of grass blades]. I used grass assets from Luxology.

Place every single grass mesh into a group and call it as you prefer. In this scene I call it "GrassMatrix".

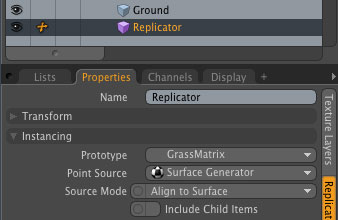
Create now a replicator. In the replicator properties, set "GrassMatrix" group as Prototype and the ground item as Point Source. Forget about any other parameter and just lunch a quick render.
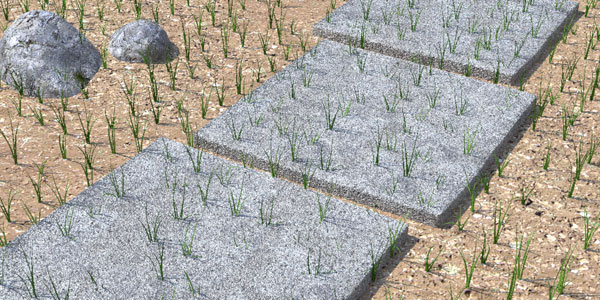
Yeah, that's the problem: the grass grows under the stones and the tiles and passes through them [I'm still thinking about the gnomes...].
We need a mask, but we can't waste our time to paint it [the scene may be much more complex than this]. So, just let's use a little trick to get it fast!
Hide the grass to the render engine by clicking on the render state in our groups palette.

Create a new render output as Ambient occlusion. Change wathever you want but do not change the Occlusion Range, it is extremely important to leave it to zero. Hide all the other render outputs.

Set the frame to a good square resolution [a too low resolution will be less useful than needed]. Now select the ground and its UV map in the list palette [if the mesh doesn't have a UV map, just create one] and launch a bake by the command Render > bake to render outputs.

Voilà! In a few seconds you get your grass "anti-gnomes" mask. Now you can use it as it is or you can elaborate it in Photoshop to add your own variations.
To use your new mask, you need a surface generator. Create one in the ground material group.
Before changing its properties, let's load our mask in the same material group, be sure to use the right UV map in its locator and change its effect to "Surface particle Density". This setting will use the dark pixels in your mask to occluding replicas placement on the ground surface.

Back to the replicator properties and substitute "Ground" with "Surface Generator". Now the replicas do not grow under the stones and tiles anymore because of your brand new mask.

It's time to change all the parameters you need to reach your grass quality in the replicator properties [random twist and scale are the most useful] and in the surface generator properties [average spacing and particle ceiling are a must].


A good way to achieve greater realism is the use of a gradient map in the grass material as "Particle ID" diffuse color to break the flat tone.


That's it! Now you can cover all the gardens with good grass.
Just a bonus...

2 comments:
Grazie Kron for the short tutorial... really cool trick to make the mask, I will definitely used it in my scene.
I'll try to finish my scene soon and show it to the community
cheers remon_v
You are welcome :)
Post a Comment