Creating pie menus is extremely simple, but not so simple to whom is not familiar with the Form Editor window, so assimilating scripts into a single shortcuts may becomes tedious.
This is a fast practice guide to pie menus and nested pie menus creation.
As you know, I like full screen mode when I'm working in Modo and don't like palettes on the edges occluding my view.
One of the best feature in Modo is the "auto-hide" pop-up palette, so you can recall only the needed palette, use it just the time you really need it and then hide it without a click. Easy, really fast and we don't waste pixels on our work space.
To everyone coming back to searching for Modo Gears updates: I'm sorry, but I'm actually on CS3 workshop and don't have time to update the collection or my test.
But if you like, you should come at View Conference 2010 and watch tons of tips&tricks about Modo and Photoshop.
I don't like interface when I'm modeling (as well as sculpting or painting), so I tend to put in pie menus or shortcuts everything covers the main tools needed to keep a perspective view in full screen.
Luxology gave us many precompiled pie menus with lots of useful commands and tools, I know, but I found that a personal touch in everything is always a must, in a program.
This is one of the most useful shortcut I use to be faster in modeling: Select Through command on a specific pie menu.
I need to thank Joe Angell who helped me with this on Luxology forums and teach me this powerful command: "?+".
This command queries the value and simply increments it everytime the options of the tool are "true" or "false". So in this command line "tool.flag xfrm.transform select ?+", it activates or deactivates Select Through option on move/scale/rotate tools.
Using this command on a pie menu with "selection modes" and the main "action center modes" can increments our speed in modeling.
this time I want to share one of my useful scripts: the edge welder.
Well, it's not properly a script, it's just a pie menu with two edited macros, one for each different use. If you downloaded previous 1.0 scripts, update the file from the download link.
The first code merges 2 distant edges in a middle position, no more, no less.
The second code is usefull to merge partial lines of edges (it doesn't touch adiacent unselected) or complete loops, nice to merge two specular meshes.
Unzip the file and: - put the .LXM file into your scripts folder; - load the config file in Modo; - put the pie menu into another pie menu or assign a key to recall the scripts.
To inaugurate this collection, I think is a good idea to talk about… gears!
This is a mini tutorial on how you may create a gear starting from a dedicated mesh asset. It's a 96 sides poly cylinder with beveled caps, a good start to generate a large set of gears. The theory is that 96 is divided by 2, 3, 4, 6, 8, 12, so we can extrude the needed cogs dimension/number, extremely useful if two or more gears must work together.
The first step is to download this mesh and put it into your assets folder.
We love Luxology Modo because it's one of the most powerful 3D application out there. But it is not so powerful as we expect out of box, because of many things that are not so intuitive or not so fast or not so fantastic as they really are before some "adjustement" or "shrewdness".
"Modo Gears" is a collection of tips&tricks, configs, tutorials, scripts that may help you to enhance your workflow with Luxology Modo.
Everything you may read or download in this section is NOT the "one way" to use the program or do the work, but may be the best way I FOUND to use Luxology Modo to do my job. You may consider this section as a collection of different ways to do your job. You are the one who can say what's the best way for you.
Everyone is invited to show me where I'm wrong or a better way to do the work, I will always thank you for that.
This section is not built to learn the basics of Luxology Modo, this section is enabled for the user who know where the tool is. I use Modo in a different way compared to the default settings and layouts, so don't ask me "where I can find that tool you put in your pie menu" or "what shortcut you press for that operation". For basics tutorials, you may find more answers in Luxology basics tutorials or user's dedicated basics tutorials.
Year: 2010 Softwares: Modo 401 - Photoshop CS3 Notes:
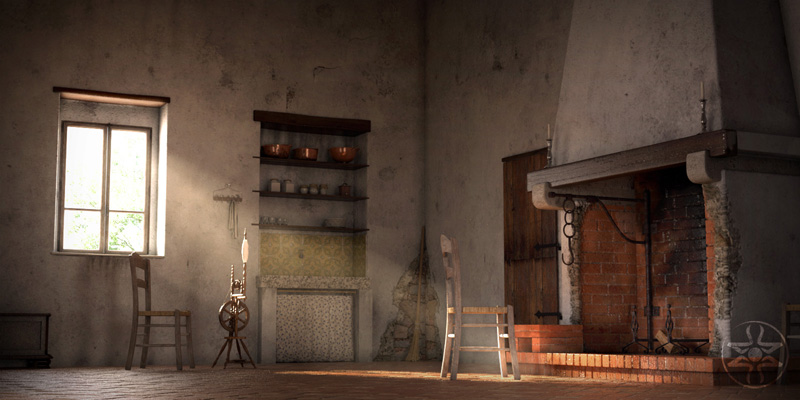
It's a rural house in Farnetella, Toscana (Tuscany) and I love these places.
The image "Farnetella" was built as a test scene for 32 bit compositing worflow in Photoshop CS3. But the result was disappointing because of some render layers problems and all the limit [and frustrations] I found in Photoshop CS3 with 32 bits compositing [I hate that program, it's official...]. I promised myself new tests but with other compositing programs as Nuke or After Effects [I know this one is not properly a compositing program, but it's far better than Photoshop]. I will share new tests results.
For this last result, I put aside Modo render passes and launched a final render with a separated volumetric pass. Then I composited everything in Photoshop with a series of correction layers to increase the "mood".
Just a little bumpy and noisy, I know, but there is not additional time fot this test scene.
I'm working on a new worflow to get the best from Modo in less time, just using "11/12" render passes then composited in Photoshop at 32bits.
It's a rural house in Farnetella, Toscana (Tuscany) and I love these places.
Actually I'm not sure about the illumination 'cause I'm working on a LCD "non professional" monitor, but I'll calibrate the levels for a final version on my trustworthy CRT.
All I can say is that working in render passes with Modo is absolutely functional. I did a lot of test to correctly match the final render and it is very hard to composit 32bits render passes in Photoshop CS3 (bad program, BAD PROGRAM!). After this, I will composit my file with a better program as After Effects.
 Texturing and shading by me, made with Photoshop and Modo.